首先要确保编辑器环境的编码为utf8,打开编码和保存编码都是utf8;其次如果py文件中含有中文字符的话,需要在py文件中对编码进行声明。
A) 设置编辑器编码:UTF-8
B) 修改python文件编码:在py文件首行加上#coding=utf-8,一定要在首行才可以
首先要确保编辑器环境的编码为utf8,打开编码和保存编码都是utf8;其次如果py文件中含有中文字符的话,需要在py文件中对编码进行声明。
A) 设置编辑器编码:UTF-8
B) 修改python文件编码:在py文件首行加上#coding=utf-8,一定要在首行才可以
Npm安装报错 RollbackFailedOptional Verb Npm-Session
设置了cmd、git、npm代理,结果还是报错,最后换了一下源,更换为淘宝的源
1 | npm config set registry http://registry.npm.taobao.org |
参考https://www.cnblogs.com/zwrsnrt/p/12492482.html
新版本hexo在使用主题时,生成页面发现无法正常显示,出现以下未渲染成功的源代码
1 | '{% extends ‘_layout.swig‘ %} {% import ‘_macro/post.swig‘ as post_template %}' |
查看显示的代码以及主题目录下的layout模板,发现hexo在新版本使用 Nunjucks 来渲染页面,但是很多主题还是旧版本hexo时编写的,使用的是Swig,所以页面没有正常使用swig渲染好,我们使用以下命令装上swig就好了
1 | npm i hexo-renderer-swig |
参考:
https://blog.csdn.net/qq_39898645/article/details/109181736
https://segmentfault.com/p/1210000010636536/read
https://blog.csdn.net/weixin_36401046/article/details/52940313
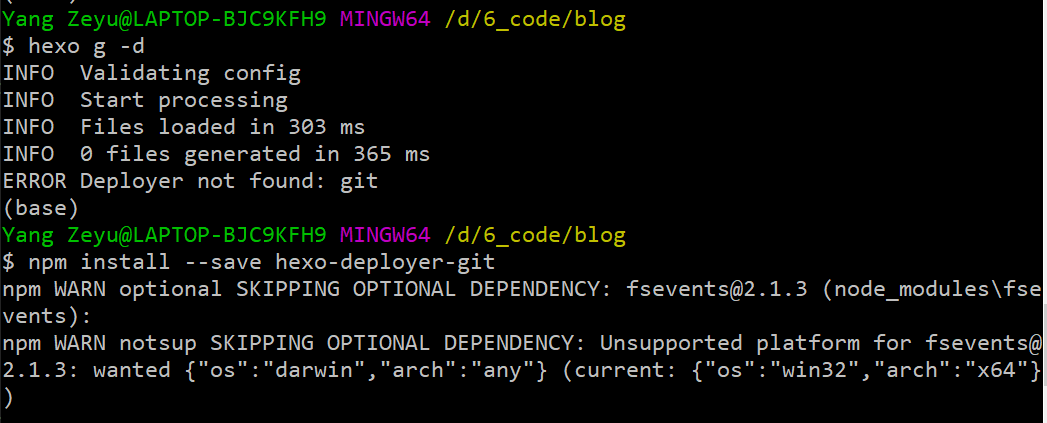
npm install –save hexo-deployer-git
有两种可能,一种是config.yml中没使用正确的缩进空格,一种是文章中有
1 | {{}},{% %} |
这种hexo无法转义的字符
官方的示例如下
The error one:
1 | plugins: |
The correct one:
1 | plugins: |
将无法转义的句子用代码块括住
之前搭建过hexo的博客,但是因为换电脑了,导致hexo的生成文件都丢了,就转战CSDN了,结果最近一篇ssr的文章审核不通过…还是用自己的博客吧…这是个hexo搭建github pages的记录博客,把搭建的流程、遇到的问题和解决方法记录下来,方便下次搭建(希望不会有下次)
1 | Node.js (建议使用 Node.js 12.0 及以上版本) |
1 | npm install -g hexo-cli |
1 | npm install hexo |
1 | npm config set registry http://registry.npm.taobao.org |
1 | hexo init <folder> |
新建完成后,指定文件夹的目录如下,如下图所示:
1 | . |
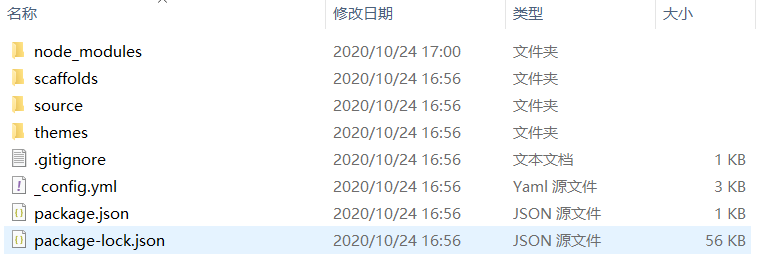
其中各个文件夹的作用;
_config.yml 网站的配置信息,您可以在此配置大部分的参数。
_config.yml 配置文档:https://hexo.io/zh-cn/docs/configuration
node_modules 存放npm安装的依赖
package.json 应用程序的信息。EJS, Stylus 和 Markdown renderer 已默认安装,您可以自由移除。
1 | package.json |
scaffolds
模版 文件夹。当您新建文章时,Hexo 会根据 scaffold 来建立文件。
Hexo的模板是指在新建的文章文件中默认填充的内容。例如,如果您修改scaffold/post.md中的Front-matter内容,那么每次新建一篇文章时都会包含这个修改。
source
资源文件夹是存放用户资源的地方。除 _posts 文件夹之外,开头命名为 _ (下划线)的文件 / 文件夹和隐藏的文件将会被忽略。Markdown 和 HTML 文件会被解析并放到 public 文件夹,而其他文件会被拷贝过去。
themes
主题 文件夹。Hexo 会根据主题来生成静态页面。
使用hexo s运行hexo项目在本地,浏览器输入http://127.0.0.1:4000/即可查看当前博客
在github上创建一个用户名.github.io的仓库,用户名中字母要注意大小写。在setting中滑到最下方有个GitHub Pages,启用它。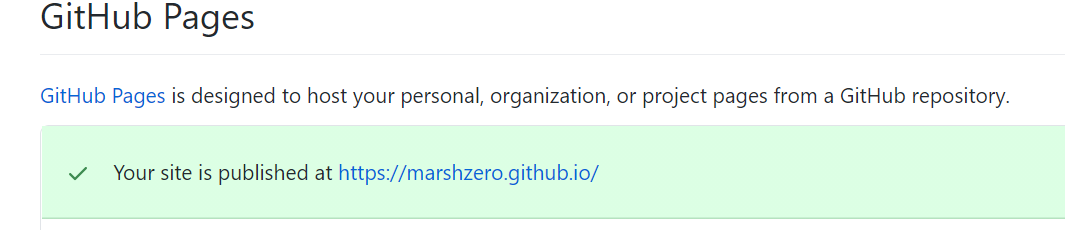
随后访问用户名.github.io即可看到初始的博客页面
在hexo博客文件夹中打开bash,输入以下命令,其中用户名和密码根据你github的注册信息修改
1 | git config --global user.name "marshzero" |
生成ssh key
1 | ssh-keygen -t rsa -C "xxxxxxx@qq.com" |
windows下打开C:/用户名/.ssh/id_rsa.pub。记事本打开并复制里面的内容,打开你的github主页,进入个人设置 -> SSH and GPG keys -> New SSH key:将刚复制的内容粘贴到key那里,名字可以写成blog或其他你能明白的名字。
输入ssh -T git@github.com,如果出现你的用户名,那就成功了。
首先,ssh key肯定要配置好。其次,配置_config.yml中有关deploy的部分:
1 | deploy: |
使用以下命令生成静态文件
1 | hexo g |
使用以下命令启动本地服务器
1 | hexo s |
使用以下命令提交静态页面到github
1 | hexo d |
常见命令
1 | hexo new "postName" #新建文章 |
这里我使用了Next主题,按照官方文档来配置就行,但是有一个小问题,就是Next主题在新版hexo中使用,会造成hexo无法渲染页面,这是因为两者的渲染插件不同,详情看这里
例如创建“分类”这个页面,在博客文件夹打开bash,执行命令
1 | hexo new page categories |
成功后会提示
1 | INFO Created: ~/Documents/blog/source/categories/index.md |
根据上面的路径,找到index.md这个文件,打开后默认内容是这样的:
1 | --- |
添加type: “categories”到内容中,添加后是这样的:
1 | --- |
给新文章添加分类或者标签属性,和下面一样就行了,其中软件配置就是分类,ubuntu和软件配置是标签
1 | --- |
使用以下命令创建新文章,会在source创建一个md文件,在这个文件中写内容就可以了
1 | hexo new 新文章示例 |
我是已经创建了hexo项目后,再来备份的,备份的策略是知乎上一个答主提的思路,具体步骤参考的https://blog.csdn.net/qq_21040559/article/details/109702142
我们的hexo项目会在github上有一个gitpages的仓库对应,在这个仓库上创建一个新分支hexo,并设置成默认分支(这里不用担心hexo自己的git push,hexo会制定master来push的,设置hexo为默认分支是为了后面使用git命令时方便)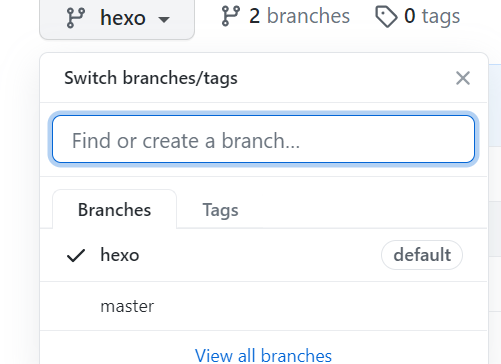
刚创建好时hexo分支的内容和master内容看起来一样,这里我也没搞懂,但是不影响后面的,不管它
在其他任意位置使用git clone将hexo分支下载下来,将其中的.git文件夹复制到我们的博客文件夹内,此时在博客文件夹中打开bash即可看到hexo的提示,这一部很妙,不用手动配置本地仓库和远程仓库对应(没有.git文件夹时不会提示这是个仓库,注意不要使用git init命令,这会将博客文件夹初始为一个新仓库。)
博客文件夹中需要一个.gitignore文件,用来在上传时候忽略一些文件,即不上传.gitignore中忽略的文件。如果有最好,没有的话自己手动添加。
1 | .DS_Store |
注意,如果你之前克隆过theme中的主题文件,那么应该把主题文件中的.git文件夹删掉,因为git不能嵌套上传,最好是显示隐藏文件,检查一下有没有,否则上传的时候会出错,导致你的主题文件无法上传,这样你的配置在别的电脑上就用不了了。
在hexo博客的根目录下依次执行
1 | git add . |
这样就能看到github上有我们要备份的hexo项目啦,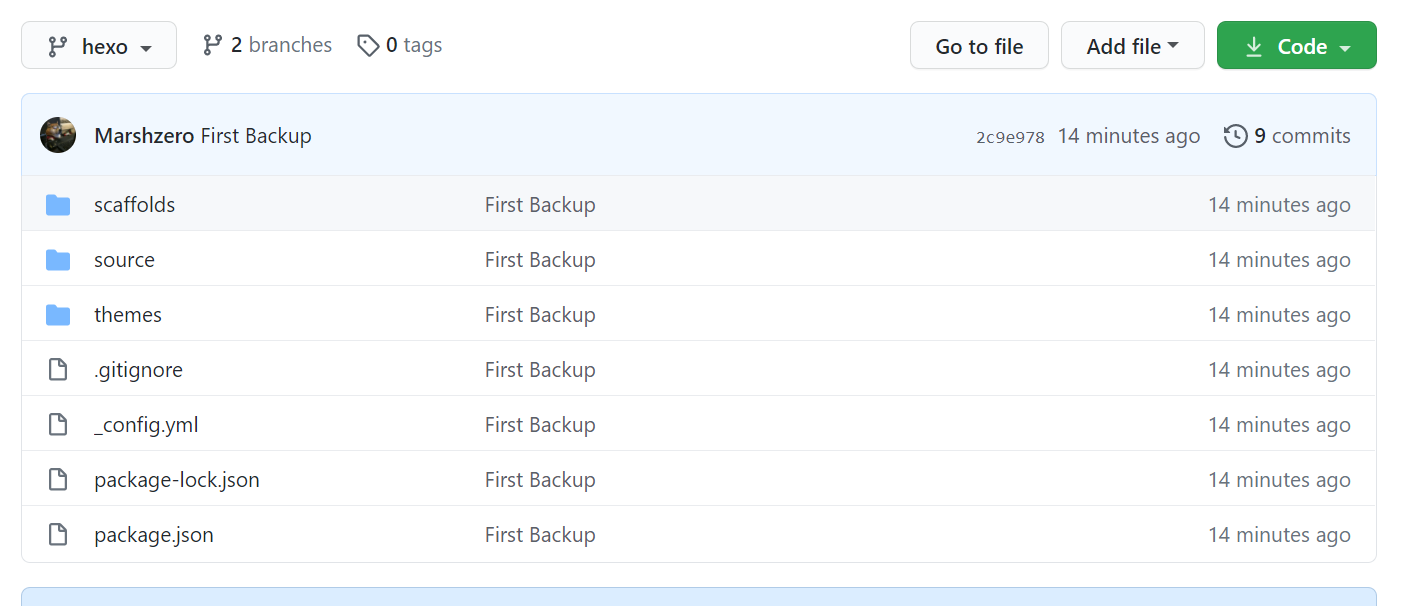
使用hexo d是将静态页面备份到github上的master,使用git push origin hexo是将hexo项目文件夹备份到github上的hexo分支。
将两个分支的内容下载并合并,安装相应的软件即可(未尝试)
https://www.codenong.com/28068872/
https://blog.csdn.net/chao_1083934282/article/details/88387727
https://blog.csdn.net/hlpower/article/details/100765278?utm_medium=distribute.pc_relevant_t0.none-task-blog-BlogCommendFromMachineLearnPai2-1.channel_param&depth_1-utm_source=distribute.pc_relevant_t0.none-task-blog-BlogCommendFromMachineLearnPai2-1.channel_param
python3.9-doc-pickle:https://docs.python.org/3/library/pickle.html
在做实验时,可能需要将数据打包成pickle文件,方便后续的读取。pickle是一个python模块,源代码在Lib/pickle.py,可将python对象进行序列化和反序列化。以下内容参考python文档和网上博客。
1 | The pickle module implements binary protocols for serializing and de-serializing a Python object structure. “Pickling” is the process whereby a Python object hierarchy is converted into a byte stream, and “unpickling” is the inverse operation, whereby a byte stream (from a binary file or bytes-like object) is converted back into an object hierarchy. Pickling (and unpickling) is alternatively known as “serialization”, “marshalling,” 1 or “flattening”; however, to avoid confusion, the terms used here are “pickling” and “unpickling”. |
Python有一个更原始的序列化模块,称为marshal,但通常pickle应该始终是序列化Python对象的首选方式。 marshal存在主要是为了支持Python的.pyc文件。该pickle模块marshal在以下几个重要方面有所不同:
该pickle模块跟踪已序列化的对象,因此以后对同一对象的引用将不会再次序列化。marshal并不这样做。这对于递归对象和对象共享都有影响。递归对象是包含对其自身的引用的对象。marshal无法处理递归对象,尝试使用marsha处理递归对象将使您的Python解释器崩溃。当要序列化的对象层次结构中的不同位置存在对同一对象的多个引用时,就会发生对象共享。 pickle仅将此类对象存储一次,并确保所有其他引用都指向主副本。共享的对象保持共享状态,这对于可变对象非常重要。
marshal不能用于序列化用户定义的类及其实例。 pickle可以透明地保存和恢复类实例,但是类定义必须是可导入的,并且与对象存储时位于同一模块中。
该marshal序列化格式是不能保证整个Python版本移植。因为它的主要工作是支持 .pyc文件,所以Python实现者保留在需要时以非向后兼容的方式更改序列化格式的权利。pickle选择了兼容的pickle协议,并且如果您的数据越过了唯一的突破性更改语言边界,则pickling和unpickling可以处理Python 2到Python 3类型的差异,则可以确保序列化格式在Python版本之间向后兼容。
pickle协议和JSON (JavaScript Object Notation)之间有基本的区别:
JSON是一种文本序列化格式(虽然大多数时间然后将其编码为utf-8,但它输出unicode文本),而pickle是一种二进制序列化格式;
JSON是人类可读的,而pickle则不是;
JSON是可互操作的,并且在Python生态系统之外被广泛使用,而pickle是特定于Python的;
默认情况下,JSON只能表示Python内置类型的子集,而不能表示自定义类。pickle可以表示大量的Python类型(通过巧妙地使用Python的自省功能,其中的许多会自动实现;可以通过实现特定的对象API解决复杂的情况);
与pickle不同,反序列化不受信任的JSON本身并不会创建代码执行漏洞。
这里也有python的json模块:一个标准的库模块,允许JSON序列化和反序列化。
所使用的数据格式pickle是特定于Python的。这样做的优点是不受外部标准(例如JSON或XDR)的限制(不能表示指针共享);但是,这意味着非Python程序可能无法重建pickling后的Python对象。
默认情况下,pickle数据格式使用相对紧凑的二进制表示形式。如果需要最佳的大小特征,则可以有效地压缩pickling的数据。
该模块pickletools包含用于分析生成的数据流的工具pickle。 pickletools源代码对pickle协议使用的操作码有大量注释。
当前有6种不同的协议可用于pickling。使用的协议越高,读取生成的pickle所需的Python版本越新。
Protocol version 0是原始的“人类可读”协议,并且与Python的早期版本向后兼容。
Protocol version 1是旧的二进制格式,也与Python的早期版本兼容。
Protocol version 2是在Python 2.3中引入的。它提供了更高效的新型es酸洗。参考PEP 307,了解有关协议2带来的改进的信息。
Protocol version 3是在Python 3.0中添加的。它具有对bytes对象的显式支持, 并且不能被Python 2.x unpickled。这是Python 3.0–3.7中的默认协议。
Protocol version 4是在Python 3.4中添加的。它增加了对非常大的对象的支持,pickling更多种类的对象以及一些数据格式优化。从Python 3.8开始,它是默认协议。参考PEP 3154,获取有关协议4带来的改进的信息。
Protocol version 5已在Python 3.8中添加。它增加了对带外数据的支持和对带内数据的加速。参考PEP 574,了解有关协议5带来的改进的信息。
pickle提供以下属性:
1 | pickle.HIGHEST_PROTOCOL |
The pickle module provides the following functions to make the pickling process more convenient:
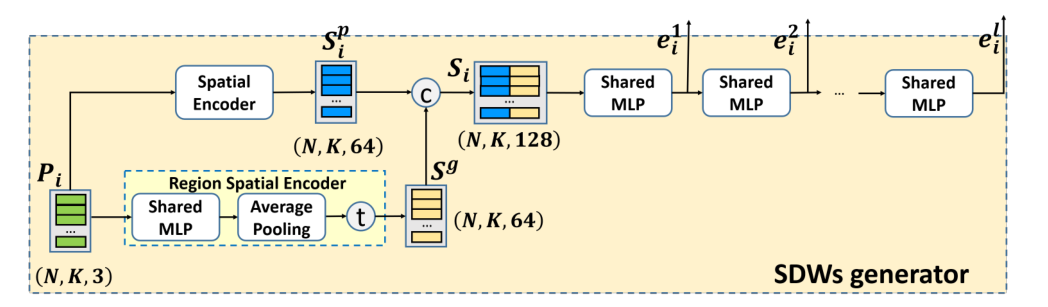
论文LSANet看的差不多,对其代码进行分析,看看是怎么实现论文中的模型。
1 | 论文地址:https://arxiv.org/abs/1905.05442 |
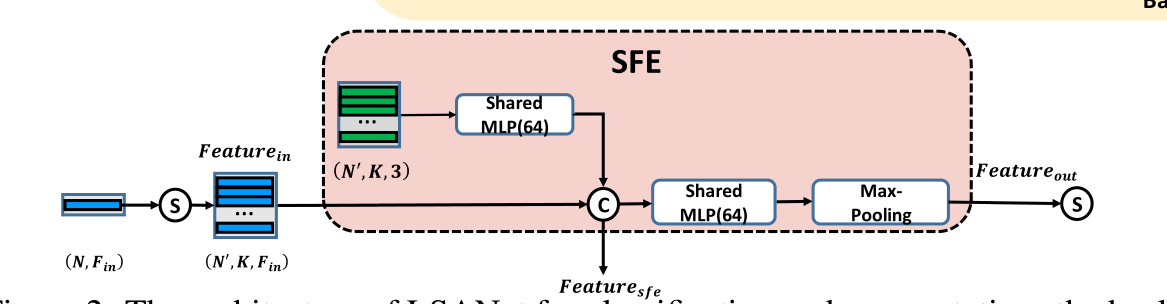
pointnet_util.py
1 | def sample_and_group(npoint, radius, nsample, xyz, points, bn, is_training, bn_decay, mlp, knn=False, use_xyz=True, xyz_feature=None, end=False, use_edge_feature=False): |
1 |
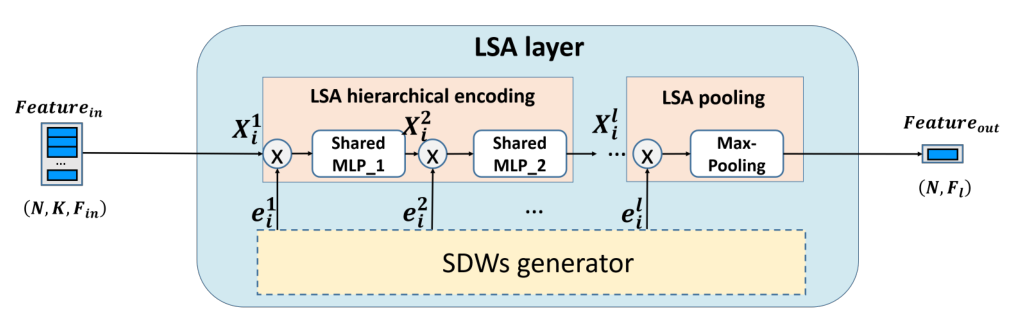
LSA layer:在下面代码函数中,会调用SFE的代码即sample_and_group()函数,随之调用LSA layer模块,也就是说LSA_layer()函数包括了SFE和LSA layer两个操作,在model的代码中通过定义多个层数来进行图示的多个layer的操作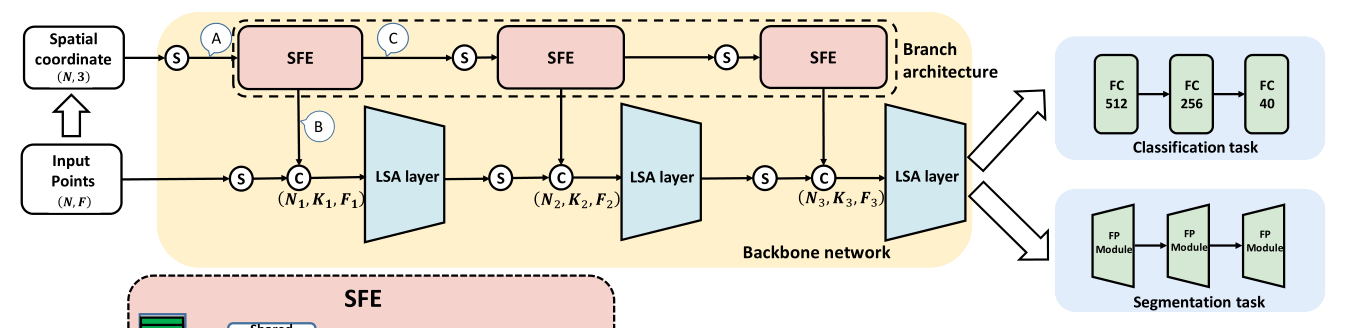
1 | def LSA_layer(xyz, points, npoint, radius, nsample, mlp, mlp2, group_all, is_training, bn_decay, |
conda install –channel https://conda.anaconda.org/menpo opencv
最近要下载一个很大的数据集,然而国内的网访问只有几十k/s,没办法只能用小飞机了。下载数据集的是一个python脚本,那只能配置全局代理了。
网址:https://github.com/shadowsocks/shadowsocks
从官网下载软件,并使用自己的账号进行配置。
配置/etc/shadowsocks.json(没有就新建一个)
1 | { |
启动服务(本地的用sslocal,不用ssserver)
1 | sudo sslocal -c /etc/shadowsocks.json |
这时配置系统代理为127.0.0.1:8080即可科学上网
网址:https://github.com/qingshuisiyuan/electron-ssr-backup
根据以上网址安装并配置,并使用命令启动,在图形化界面配置账号信息
Terminal只支持http、https协议,而ShadowSocks使用的是socks协议,ssr同理。我们可以使用Privoxy来将http和socks相互转换。
首先,使用下面的命令安装Privoxy:
1 | sudo apt-get install privoxy |
安装完毕后,打开Privoxy的配置文件/etc/privoxy/config:
1 | sudo gedit /etc/privoxy/config |
第一步定位到4.1. listen-address 这一段,找到监听的端口,我的是在第783行: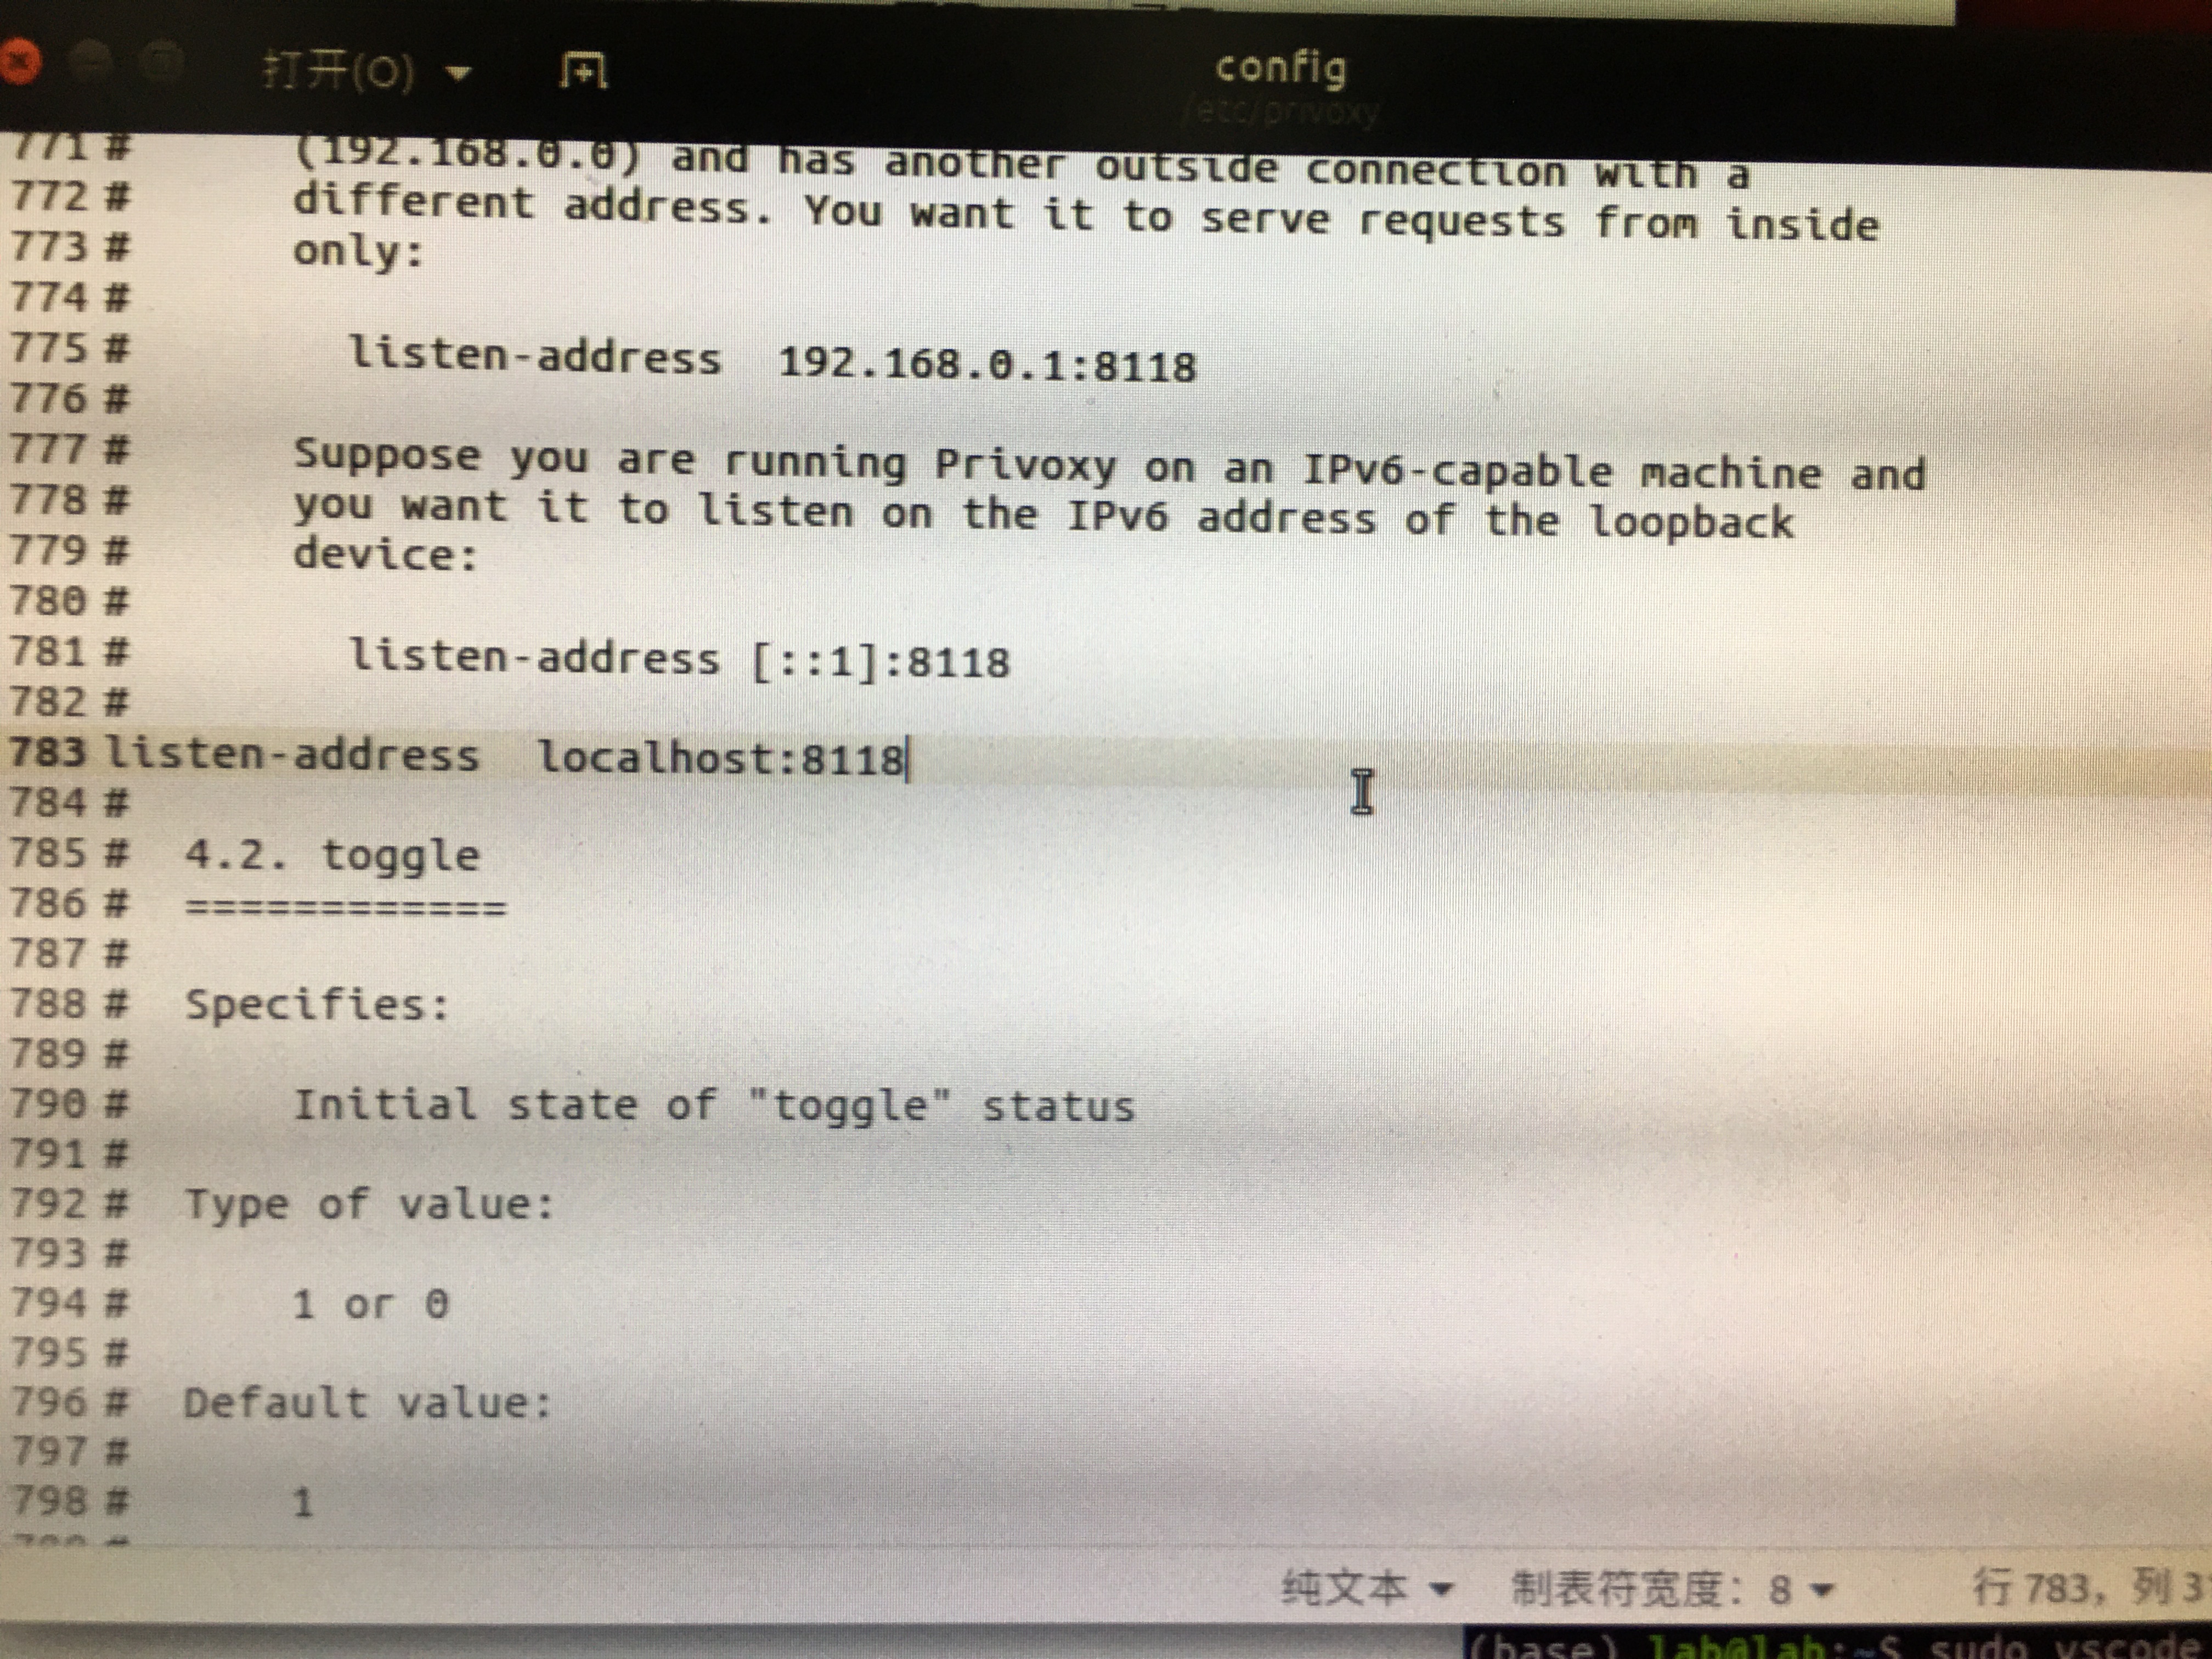
可以看到端口一般都是8118。
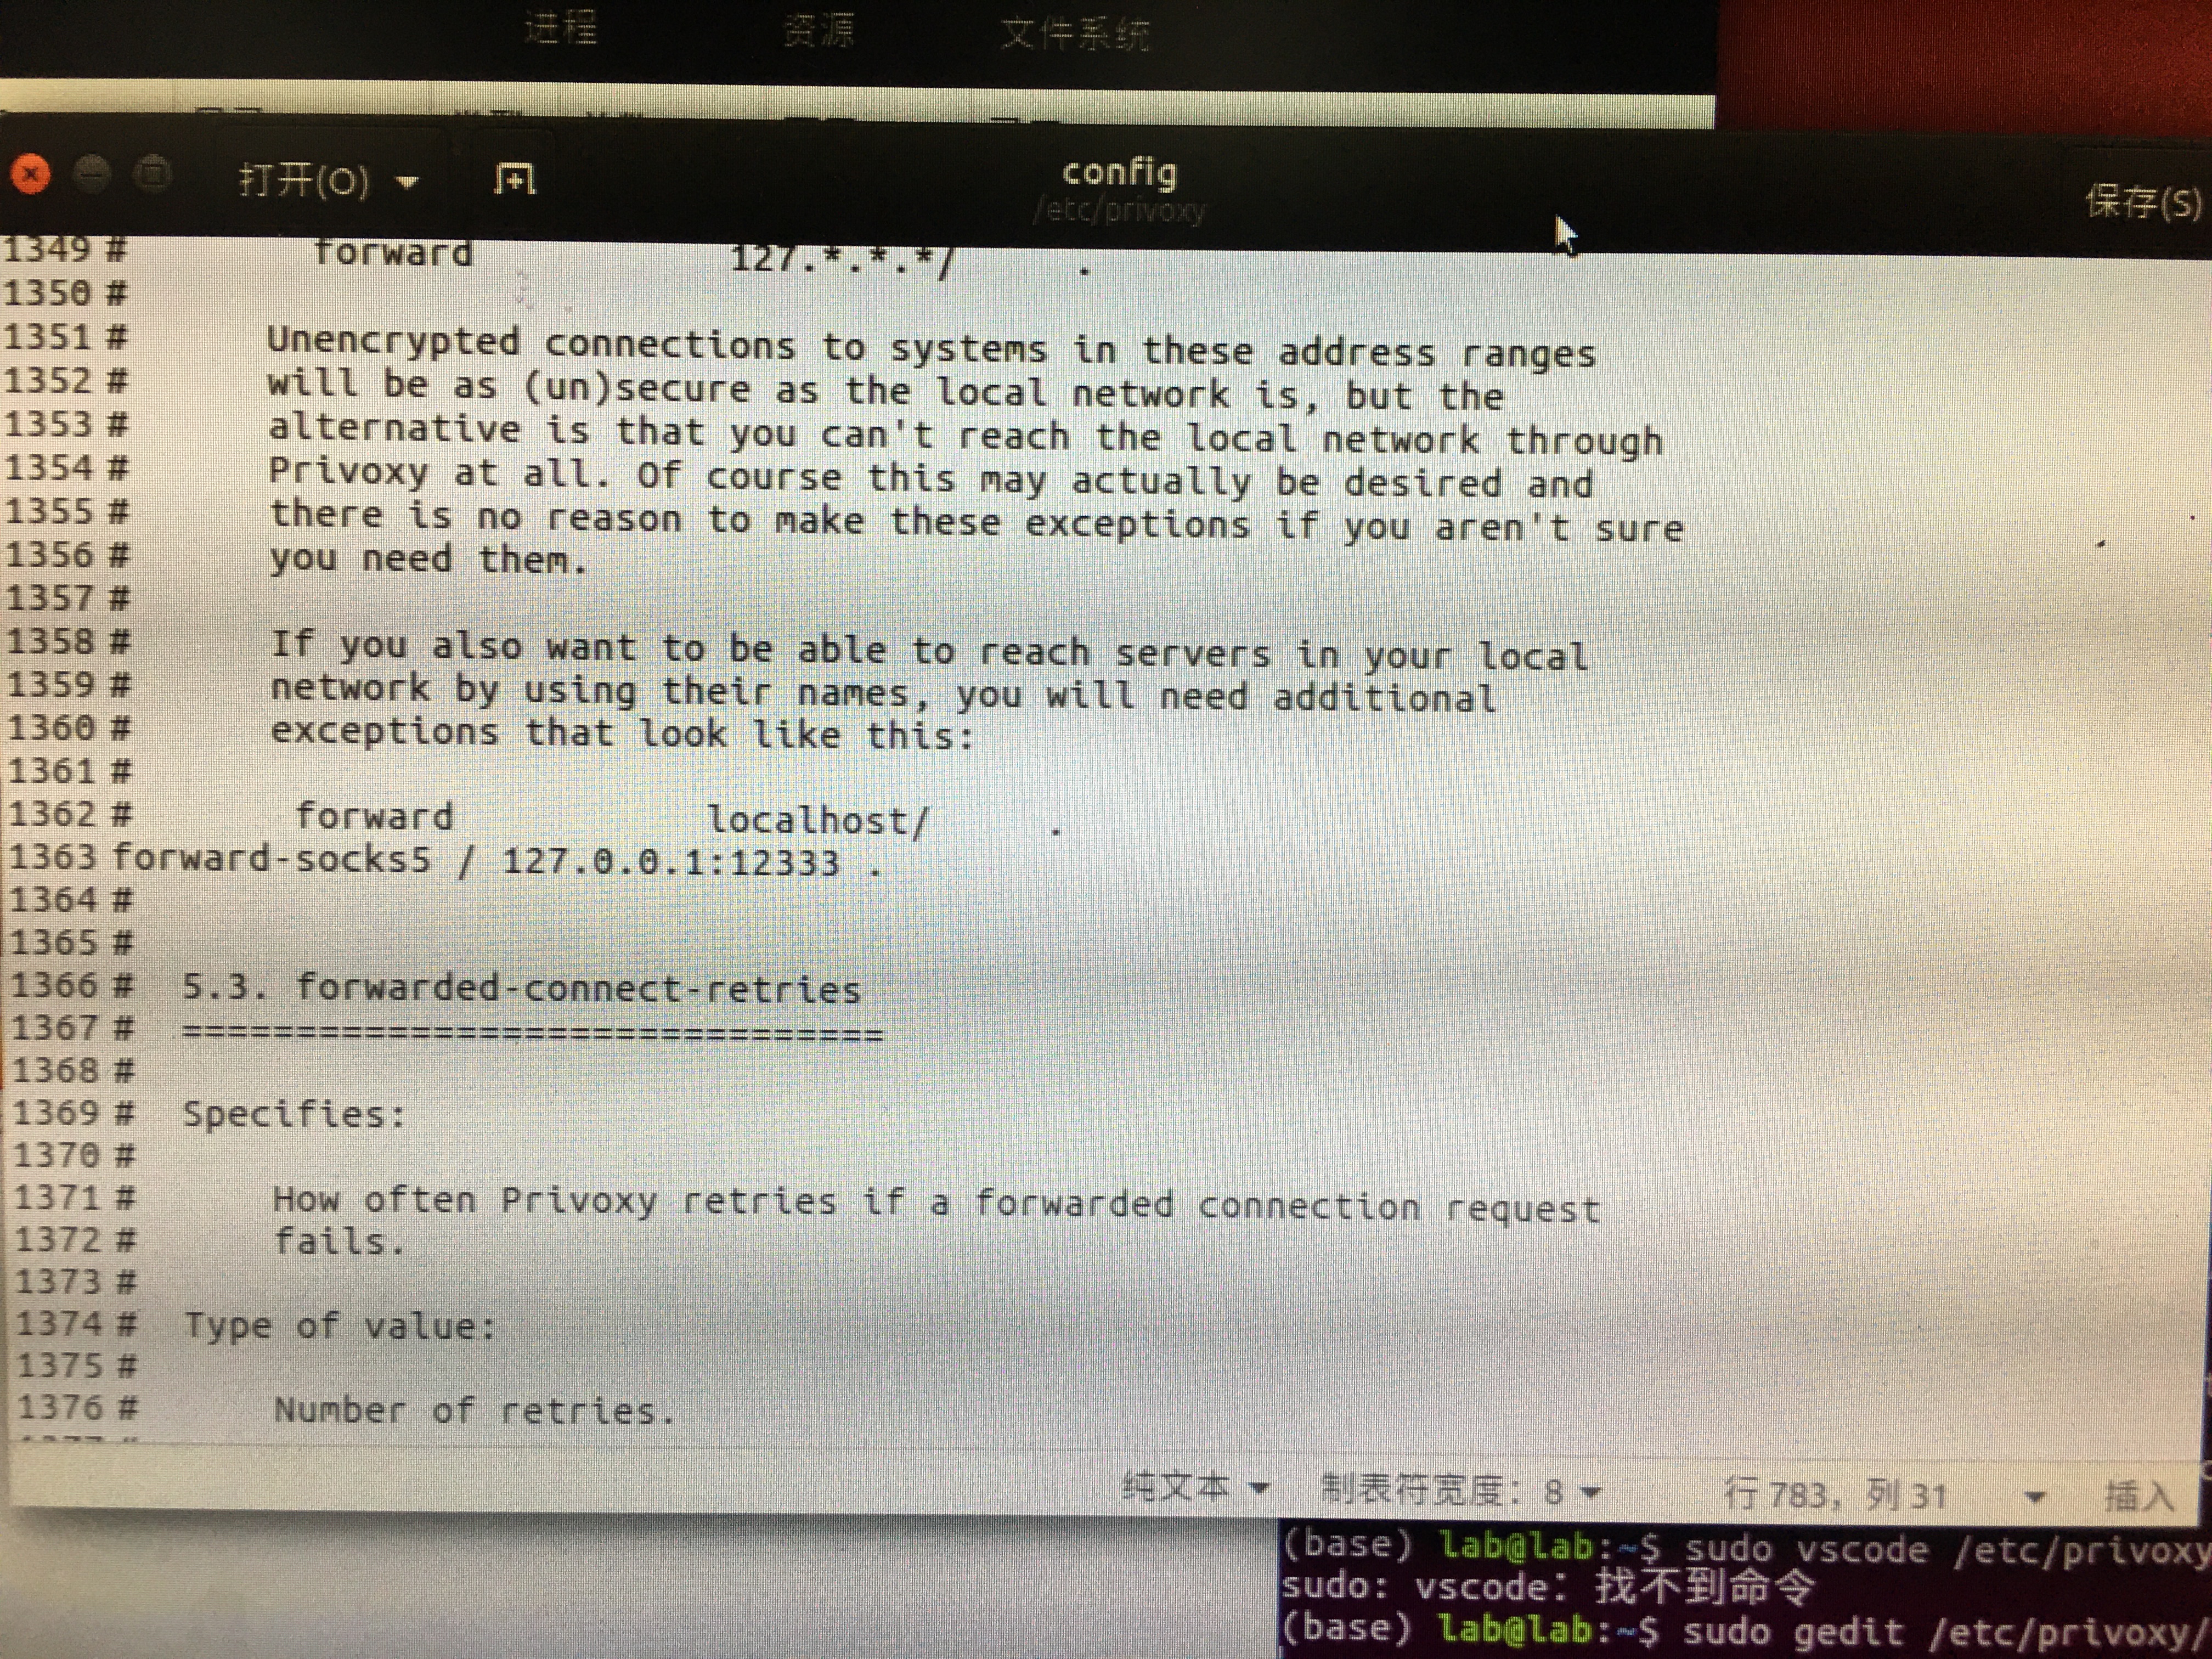
接着找到5.2. forward-socks4, forward-socks4a, forward-socks5 and forward-socks5t这一节,加上如下配置(图中是ssr的配置):
1 | forward-socks5 / 127.0.0.1:1080 . |
保存后,重启一下Privoxy:
1 | sudo /etc/init.d/privoxy restart |
接着配置终端的环境,打开终端配置文件:
1 | sudo gedit ~/.bashrc |
在末尾追加下面代码:
1 | export http_proxy="127.0.0.1:8118" |
保存文件后,重启终端或者执行下面的命令重新读取配置文件:
1 | source ~/.bashrc |
使用下面代码来测试穿墙是否成功:
1 | wget http://www.google.com |
穿墙成功,接着将Privoxy添加到开机启动,在/etc/rc.local中添加如下命令,注意在exit 0之前:
1 | sudo /etc/init.d/privoxy start |
在/etc/profile的末尾添加如下两句:
1 | export http_proxy="127.0.0.1:8118" |
到这里就可以使用Terminal来科学上网了,注意这部分是根据ss中默认本地端口为1080的情况,如果是ssr,端口是12333,要配置成相应的12333端口。其本质就是ss或ssr进行listen,系统设置代理后,出网的数据要流到127.0.0.1:1080(或12333),ss和ssr listen 后接收数据并通过自己的信道传输。加上privoxy后,就是系统代理发到privoxy,然后privoxy再发到ss ssr上,这中间privoxy可以转发sock5的,也就实现了terminal的穿墙
PLY是一种三维mesh模型数据格式,全名为多边形档案(Polygon File Format)或 斯坦福三角形档案(Stanford Triangle Format)。
该格式主要用以储存立体扫描结果的三维数值,透过多边形片面的集合描述三维物体,与其他格式相较之下这是较为简单的方法。它可以储存的资讯包含颜色、透明度、表面法向量、材质座标与资料可信度,并能对多边形的正反两面设定不同的属性。
在档案内容的储存上PLY有两种版本,分别是纯文字(ASCII)版本与二元码(binary)版本,其差异在储存时是否以ASCII编码表示元素资讯。
ply文件的基本格式如下
1 | This is the structure of a typical PLY file: |
从ply到end_header是头部,element可以有多个property,例如vertex可以有xyz三个property。ply示例如下:
1 | ply |
这里是一个对ply文件的解释
http://paulbourke.net/dataformats/ply/
这里有一个ply文件的示例
http://paulbourke.net/dataformats/ply/example1.ply
1 | from plyfile import PlyData |
使用plydata.read读取ply文件,可以看到ply_data是头部信息
1 | ply_data = PlyData.read('../repo/bun_zipper.ply') |
# 输出
ply
format ascii 1.0
comment zipper output
element vertex 35947
property float x
property float y
property float z
property float confidence
property float intensity
element face 69451
property list uchar int vertex_indices
end_header
读取顶点信息
1 | vertex = ply_data['vertex'] |
可以看到输出的是顶点vertex及它的property的信息
# 输出
element vertex 35947
property float x
property float y
property float z
property float confidence
property float intensity
读取面的信息
1 | face = ply_data['face'] |
# 输出
element face 69451
property list uchar int vertex_indices
将三个坐标合在一起并输出
1 | x = np.asarray(vertex['x']) |
#输出
(35947,)
(35947, 3)